
Testing is an essential part of development. To be honest, in some companies or projects, developers and stakeholders only focus on delivering code fast. That usually means skipping testing. But when you’re working on a large-scale system with lots of business complexity, you can’t avoid it.
A small side effect in one bug fix can cause serious damage, and even a small refactor can introduce a bunch of new bugs. Sure, writing high-coverage tests can sometimes increase development time by 2–3x, but they assure system reliability.
So, first of all: writing tests is not always a must. But if the team and stakeholders are okay with paying the time cost, the result is a robust and consistent application.
In this blog, we’ll go over how Go runs tests, check out some features of go test, and then look at best practices for writing effective tests.
How Golang runs tests
when you run:
go test ./...a few things happens under the hood
- Go looks for test files
- Any file ending with
_test.gois considered a test file. These files are ignored during a normal build, but they’re picked up by the test runner.
- Any file ending with
- Go compiles your code + test files into a temporary test binary
- Each package gets built along with its tests into a separate executable. That’s why tests run per-package, in isolation.
- The test binary runs
Test*functions- Any exported function with the signature
func TestXxx(t *testing.T)gets executed. Similarly,BenchmarkXxx(b *testing.B)runs benchmarks, andExampleXxx()runs documentation examples.
- Any exported function with the signature
- Exit code determines success/failure
If all tests pass, the binary exits with0. If any fail, you get a non-zero exit code.
This design makes Go tests fast, isolated, and consistent.
How Packages Work in Test
In Go, you’ve got two main styles of writing tests:
- Internal tests (same package)
Put tests in the same package as your code (mypkg/mypkg_test.go). This lets you test unexported functions too. - External tests (different package)
Usepackage mypkg_test. This forces you to test only the public API of your package since you can’t access private functions. It’s a great way to make sure your exported interfaces behave as expected.
The go test Command: Features and Flags
Before we dive into best practices, let’s look at some useful go test features and flags:
Verbose Output
go test -v ./..Prints the name and result of each test.
Run Specific test with Regex
go test -run TestUserLogin ./..Great for debugging single tests.
Measure Coverage
go test -coverprofile=coverage.out ./...
go tool cover -html=coverage.out
Calculates coverage and opens an HTML report showing which lines are covered and which aren’t.
Detect Data Races
go test -race ./...Runs with the race detector. (Keep in mind: memory usage may increase 5–10x, and CPU usage 2–20x.)
Run tests multiple times
go test -count=5 ./...Runs each test 5 times — helpful for flaky tests.
Skip Long Tests with -short
In your test code:
if testing.Short() {
    t.Skip("skipping long test in short mode")
}
Run tests in short mode:
go test -short ./...Lets you skip expensive tests locally while still running them in CI.
Parallel tests
go test -parallel=8 ./...Sets the max number of tests that can run in parallel (default is GOMAXPROCS). Combine this with t.Parallel() inside tests for maximum speed.
now that we know some features of go test let's talk about best practices and how to use them.
Best Practices
Stick to standard library
The testing package covers about 80% of what you need. Learn it first before adding tools like Testify or GoMock. Don’t make your tests complicated or slow if you don’t really have the use case for it.
Name Test Clearly
Using clear test names helps with debugging and also lets you keep track of which scenarios are covered and exactly what each test checks.
func TestUserLogin_Success(t *testing.T) {}
func TestUserLogin_InvalidPassword(t *testing.T) {}
Use Timeouts
Using timeouts in tests is a must. Just like your application has a reasonable response time, your tests should too — and you can’t make CI wait forever for them to finish.
Use Table Driven Tests
Table-driven testing is a technique that helps us organize and write clean tests, while also allowing us to focus on specific scenarios.
Let’s say we have a User struct and a function to validate it, and now we want to test that function.
type User struct {
	Name   string
	Income int64
}


func validateUser(user *User) error {
	///impl
}
There are some basic scenarios we can think of:
- Username and income are required
- Income cannot be a negative number
- Name cannot exceed 256 characters
- Username must not already be taken"
The classic approach is to write a separate test function or subtest for each scenario.
func TestUserValidation_Success(t *testing.T)
func TestUserValidation_RequiredIncome(t *testing.T)
func TestUserValidation_RequiredUsername(t *testing.T)
func TestUserValidation_NegativeAmount(t *testing.T)
func TestUserValidation_UsernameLength(t *testing.T)
func TestUserValidation_TakenUsername(t *testing.T)
As you can see, we end up with multiple functions, each with its own implementation — lots of code, and the patterns can vary from one to another.
Now let’s try it again with a table-driven approach. In this method, each scenario follows a basic structure:
- Define the
validateUserfunction - Define the expected values
- Compare the output with the expected result
- Log an error message if it doesn’t match"
So, we define a struct that holds the input and expected result for each scenario, and then run through them. The code looks like this:
func TestValidateUser(t *testing.T) {

	table := map[string]struct {
		Input    *User
		Expected error
	}{
		"Success": {
			Input: &User{
				Name:   "valid name",
				Income: 1000,
			},
			Expected: nil,
		},
		"RequiredIncome": {
			Input: &User{
				Name:   "valid name",
				Income: 0,
			},
			Expected: errors.New("income is required"),
		},
		"RequiredUsername": {
			Input: &User{
				Name:   "",
				Income: 1000,
			},
			Expected: errors.New("username is required"),
		},

		"NegativeIncodme": {
			Input: &User{
				Name:   "valid name",
				Income: -100,
			},
			Expected: errors.New("income cannot be negative"),
		},
	}

	for name, data := range table {
		tt := data
		t.Run(name, func(t *testing.T) {
			err := ValidateUser(tt.Input)
			if err != tt.Expected {
				t.Errorf("expected %v got %v", tt.Input, tt.Expected)
			}
		})
	}

}
As you can see, we create table-like data for scenarios, inputs, and expected results, then compare them. This way, you can focus on the actual function, your tests stay more structured, and it’s easier to spot which inputs caused errors.
Skip & Categorize tests
One common mistake developers make is treating all tests the same — running them together and keeping them in the same package. But each test type has its own use case, like E2E, integration, or unit tests. You don’t need to lump them all together, and you don’t need to run them every time. So, let’s check out some ways to categorize them.
Using Packages
You can categorize your tests using packages. For example: keep internal test files for testing internals, use a separate test package for interfaces, and an external test package for integrations. Here’s what that structure might look like:
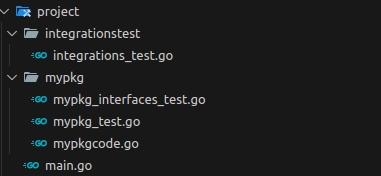
You can write internal tests in mypkg_test.go, which belongs to the mypkg package and starts with package mypkg.
Then, for testing exported functions, you can use mypkg_interfaces in the mypkg_test package, which starts with package mypkg_test.
Finally, place your integration tests in a separate integration test package.
You don’t need to run all tests when working on an internal bug fix or feature. You can design your application delivery flow and run tests selectively based on it.
Using Build Tags
You can use build tags to categorize your tests. For example, if you have specific builds, you can use a build tag to control what gets compiled in that build. This works for tests too. For instance, I have an integration_test file:
//go:build integration
// +build integration

package myapp

import "testing"

func TestDatabaseConnection(t *testing.T) {
    if testing.Short() {
        t.Skip("skipping integration test in short mode")
    }

    // Imagine this connects to a real database
    connected := connectToDatabase()
    if !connected {
        t.Fatal("failed to connect to database")
    }
}
I used the integration tag, and now when running tests:
go test -tags=integration ./...This way, these tests won’t run during a normal test run. You can also use multiple tags and run tests selectively based on your needs.
Using -short flag
In many cases, we don’t want to spend a lot of time waiting for tests. We just want a quick check to see if anything important broke after a code change. You can separate some tests using t.Short() and run them with the -short flag, as mentioned earlier.
Fuzz tests and Random values
Fuzz testing is an interesting approach to test your functionality — it basically tries as many random values as possible to break your function. As you can guess, this helps cover scenarios you might have missed. Go provides the testing.F feature (FuzzXxx) to make this easier. Let’s look at an example:
let's say we have this function
func Reverse(s string) string {
    r := []rune(s)
    for i, j := 0, len(r)-1; i < j; i, j = i+1, j-1 {
        r[i], r[j] = r[j], r[i]
    }
    return string(r)
}
here's fuzz test
package myapp

import "testing"

func FuzzReverse(f *testing.F) {
    // Seed corpus: starting examples for fuzzing
    f.Add("hello")
    f.Add("racecar")
    f.Add("世界") // non-ASCII

    f.Fuzz(func(t *testing.T, orig string) {
        rev := Reverse(orig)
        doubleRev := Reverse(rev)

        if orig != doubleRev {
            t.Errorf("Before: %q, after: %q", orig, doubleRev)
        }
    })
}
First, fuzz test functions are written as FuzzXxx(*testing.F). You start by providing some seed values, and then t.Fuzz generates random values to pass to your function and test it.
you can run it like this
go test -fuzz=FuzzYou can also set a timeout to run the fuzz test for a specific duration.
go test -fuzz=FuzzReverse -fuzztime=10sFor debugging and reproducing errors, Go saves the generated random data as a corpus file under:
testdata/fuzz/FuzzReverse/Use Random Values for Idempotent Tests
Using random values has benefits beyond fuzz testing. They can prevent test overlaps and make your tests idempotent, so you don’t have to rely on an empty database state.
For example, if you have a unique username in your user entity and want to run multiple tests, using a static username would require cleaning up the database before each test. With random usernames, you can run your tests repeatedly without extra setup.
Conclusion
When it comes to writing tests, many developers don’t pay enough attention because they focus on developing features. But here’s the thing: writing good tests makes your features more consistent, easier to maintain, and simpler to improve.
Equally important is your testing strategy — it should be designed around your application delivery flow. It’s not just about achieving high coverage; you also need to think carefully about when and why each test runs to ensure fast and robust application delivery.
Testing is a crucial part of every application, especially large-scale ones. In this blog post, I tried to cover some basics and share my experience with Go testing. There are still many more topics to explore, like parallel testing, race conditions, coverage, BDD, TDD, and more. I may write another post to cover those as well. I hope you found this helpful — I’d love to hear your thoughts!